


Table of contents
Web forms are a crucial part of any website that requires user input. They allow users to submit information, sign up for newsletters, and make purchases. However, creating a web form that is both visually appealing and functional can be a daunting task, especially for beginners.
In this article, I will guide you through creating stunning web forms using HTML and CSS. We will cover the basics of HTML form elements, styling with CSS, and best practices for optimizing your forms for SEO and user experience. By the end of this article, you will have the knowledge and skills to create custom web forms that will enhance the user experience on your website.
Basics of HTML form elements
The basics of HTML form elements include the
Tag, which is used to create a form on a web page, and various input types such as text, password, radio buttons, checkboxes, and drop-down menus. Each input type has its attributes, such as the "name" attribute for identifying the input, the "required" attribute for making the input mandatory, and the "placeholder" attribute for providing a hint to the user about what to enter. The tag also associates a label with an input element for better accessibility.
Various form elements, such as textareas, buttons, and input fields, are contained within the
element. Users can input information that can be forwarded to a server for processing.
The fundamental form components are:
<form>:This is a form control that can be used to create text fields, checkboxes, radio buttons, submit buttons, and other controls.
<textarea>: Used to create multi-line text fields.
<select>: Used to create drop-down lists.
<button>: Used to create clickable buttons.
Within the <form> tags, you specify:
The form action—the URL to the form data—is submitted.
The form method is GET or POST.
The input name attributes - To identify the form controls when submitting the data.
The input type attributes (text, checkbox, submit, etc.).
Event listeners: to handle the form submission.
When the form is submitted, the input names and values are sent as URL parameters (for GET) or in the request body (for POST) to the specified action URL (and his part is mostly applicable to the backed developer).
Form Attributes
Certainly! In HTML, a form is used to collect user input. Form elements can have attributes that provide additional information or functionality. Let's break down some common form attributes for beginners:
action:
- This attribute specifies the URL where the form data should be sent when the user submits the form. It defines the backend script, or endpoint that will process the form data.
    <form action="/submit_form.php" method="post">
        <!-- form elements go here -->
    </form>
method:
- The method attribute determines how the form data should be submitted. It can be either "get" or "post." "Get" appends the form data to the URL, while "post" sends it in the body of the HTTP request.
    <form action="/submit_form.php" method="post">
        <!-- form elements go here -->
    </form>
name:
- The name attribute is used to identify form controls when the form is submitted. It is essential for server-side processing of form data.
<input type="text" name="username" />
id:
- The id attribute provides a unique identifier for a form element. It is useful for styling with CSS or scripting with JavaScript.
<input type="text" id="emailInput" />
placeholder:
- Placeholder text is a brief hint describing an input field's expected value. It's displayed in the input field before the user enters a value.
<input type="text" placeholder="Enter your name" />
required:
- The required attribute indicates that a form field must be filled out before submitting the form. It helps in enforcing mandatory fields.
<input type="text" name="fullname" required />
type:
- The type attribute defines the type of the form element. For example, "text" for a single-line text input, "password" for a password input, and "submit" for a submit button.
    <input type="text" />
    <input type="password" />
    <input type="submit" />
value:
- The value attribute sets the initial value for form elements like text inputs or buttons.
    <input type="text" value="Default Text" />
    <input type="submit" value="Submit Form" />
So, Understanding all the attributes used to create a form, let's proceed to create a Form and later add the styling, which is the CSS syntax, you can copy the code below to try it out
    <!DOCTYPE html>
    <html>
    <head>
        <title>Stunning Web Form</title>
        <link rel="stylesheet" href="form.css">
    </head>
    <body>
        <div class="form-container">
            <div class="form-header">
                <h2>Create an Account</h2>
            </div>
            <form>
                <div class="form-group">
                    <label for="name">Name</label>
                    <input type="text" id="name" name="name" required>
                </div>
                <div class="form-group">
                    <label for="email">Email</label>
                    <input type="email" id="email" name="email" required>
                </div>
                <div class="form-group">
                    <label for="password">Password</label>
                    <input type="password" id="password" name="password" required>
                </div>
                <div class="form-button">
                    <button type="submit">Sign Up</button>
                </div>
            </form>
        </div>
    </body>
    </html>
And then you will have a kind of output like this

Then, to make it a better one, let's style it with CSS
    /* Form container */
    .form-container {
        width: 400px;
        margin: 0 auto;
        padding: 20px;
        background-color: #f2f2f2;
        border-radius: 5px;
    }

    /* Form header */
    .form-header {
        text-align: center;
        margin-bottom: 20px;
    }

    /* Form fields */
    .form-group {
        margin-bottom: 20px;
    }

    .form-group label {
        display: block;
        font-weight: bold;
        margin-bottom: 5px;
    }

    .form-group input[type="text"],
    .form-group input[type="email"],
    .form-group input[type="password"] {
        width: 100%;
        padding: 10px;
        border: 1px solid #ccc;
        border-radius: 3px;
    }

    /* Form button */
    .form-button {
        text-align: center;
    }

    .form-button button {
        padding: 10px 20px;
        background-color: #4267B2;
        color: #fff;
        border: none;
        border-radius: 3px;
        cursor: pointer;
    }

    .form-button button:hover {
        background-color: #3b5998;
    }
Then, check out your browser for the output
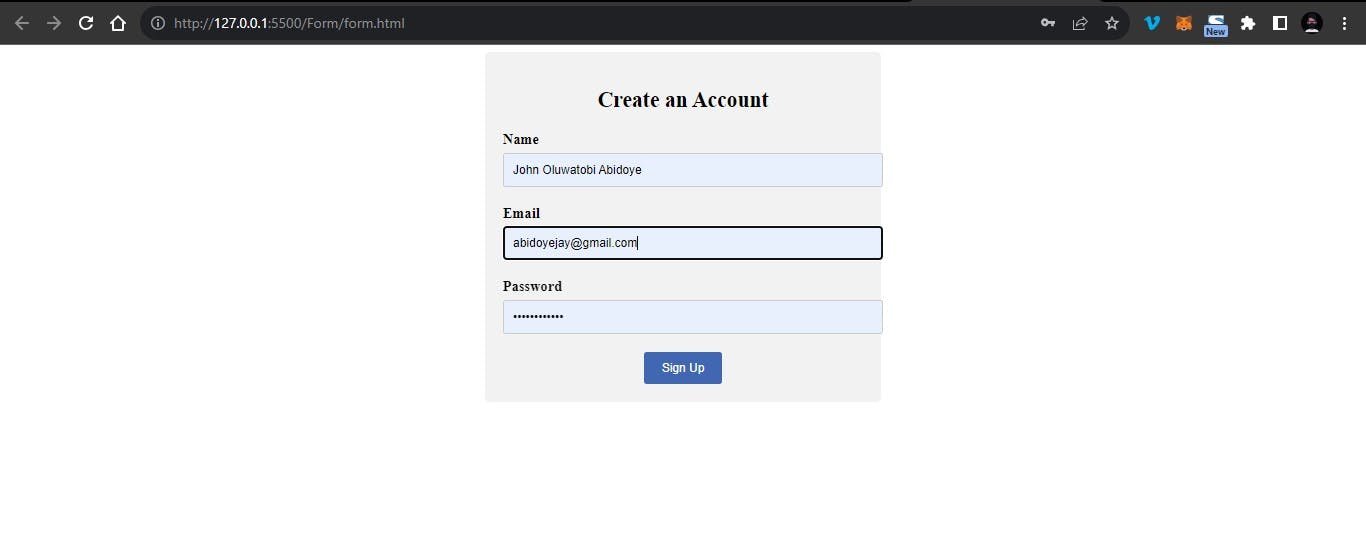
Conclusion
In this article, you looked at how to create a web form with HTML and CSS
I'm hoping this manual was very helpful to you.
I'm happy you read through this article. I'd want to connect with you if you liked this essay and learned something new from it.
Let's connect on
Twitter @SardiusJay LinkedIn @Oluwatobi Abidoye
See you in the next article. Bye Bye 🙋♂️

Share with me your idea in the comment below about how this content has really helped you🤓🤓🤓